Node.js and npm Tutorial
Knowing how to use npm is a requirement for using many cool things such as webpack and eleventy, so here is a tutorial on everything you need to know!
If you have questions or feedback regarding the tutorial, please use the comment section at the end of the page! Don't be shy; I know it's frustrating when you're stuck, and I'd love to help.
Command Line
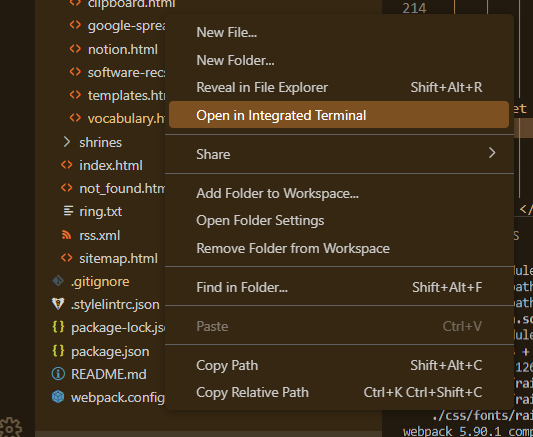
In this tutorial we will be executing commands in a command line. If you're using Windows you can use the Windows PowerShell for this (you might have to open it as an administrator). If you're using VSCode to code you can also open a terminal in VSCode (right-click on file free and choose "Open in Integrated Terminal").
When I give you a command, for example npm --version, this means you have to type that in and press enter. It will output one or multiple lines of information (in this case your installed version of npm).
Tip: You can use the up-arrow key on your keyboard to load the most recent command. This is practical if you have a command you need to execute again and again.
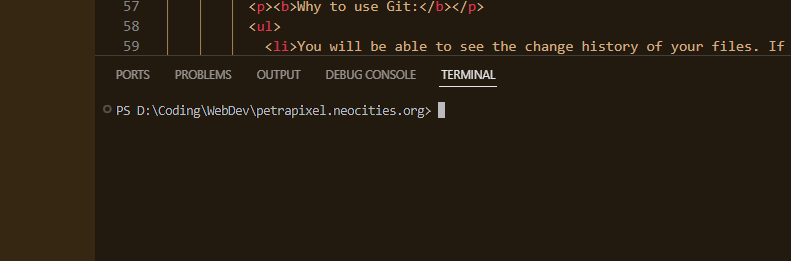
Make sure the current path in your terminal is the root folder of your project (e.g. D:\Projects\my-project). The current path in your terminal is shown to the left of where you type. If you've opened the integrated terminal in VSCode the path should already be correct. If you need to change the path of the terminal you can do this with the cd command (= "change directory"):
cd ..will go one folder up.cd <path>(e.g.cd D:\Projects\my-projectorcd my-project) will switch to that directory
Definitions
Before we start we need to define some terms.
Node.js (Node) is a JavaScript runtime environment that executes JavaScript code outside of a web browser. Check if you have it installed via node --version. When you install Node.js, npm is also automatically installed.
npm (Node Package Manager) is a tool which will allow you to install third party libraries/packages (other people's code, such as webpack or eleventy) by using the command line. Check if you have it installed via npm --version. When you install Node.js, npm is automatically installed, which means you don't need to install this seperately.
FYI: We will be installing node and npm globally (once on your device) and all packages locally (once per project).
Additional Definitions
You don't technically need to know this, but it's good to know, especially when following tutorials online.
nvm (Node Version Manager) (Not to be confused with npm!) is a tool that allows you to download and install multiple different versions of Node.js. Check if you have it installed with nvm --version. We will not use nvm in this tutorial, but be aware of its existence (and how its different from npm) when googling!
npx (Node Package Executor) (Not to be confused with npm!) is a tool that lets you execute commands from packages without the need to add them as a dependency, e.g. npx webpack without having webpack installed. (npx essentially installs the package temporarily.) It's good to try things out. If you do have the package installed it does use the installed version instead, so don't be confused if (for example) tutorials tell you to use npx webpack even though you have webpack installed as a dependency. npx is automatically installed when you install npm, so you don't need to do any additional work to use it.
Some examples of packages you can install with npm:
- Webpack will take all your CSS, SCSS and JavaScript files and generate one big JavaScript file out of them all. Webpack itself requires a bunch of other packages (such as css-loader) to work. (I have a tutorial on how to set it up here.) My tutorial is coming soon.
- Eleventy is a static site generator. You can create "templates" (either .html or .njk files) and re-use them. This way you don't have to edit your header in every single page file, etc. Then you execute a command, and Eleventy will generate all your page files for you. These files you can upload to your website as you normally would. (I have a tutorial on how to set it up here.) Here is my tutorial.
- tippy.js styles your tooltips
- and many many many more...
Installation
First, we will need to install Node.js on our device. Download the node.js installer from here and execute it to install Node.js on your computer.
We will now check if the installation was successful. Open a terminal of your choice (e.g. Windows PowerShell, or a terminal in VSCode) and execute the command node -v. It should show the version you just installed.
Also execute npm -v to check if npm was also successfully installed (it will show a different version than node, that's okay).
If both commands work and show you a version you have successfully installed node and npm! :)
Tip: If you ever need a newer version of node, just download the newer installer and go through the installation wizard again. It will replace your current version with the newer one. Only do this if you know it won't mess with your projects!
Note: If you need multiple different node versions on your computer because you have projects that require different node versions, you can use nvm (Node Version manager) (not to be confused with npm). This tutorial will not include this.
Once you've installed node and npm you don't need to do it again. It's installed on your device, not in your project, so you can use it in all your projects.
Project Setup
We will now initalize our project as an npm project. We do this by creating a file with the name package.json in the root folder of our project (e.g. D:\Projects\my-project\package.json)..
Add this in the file:
{
  "name": "your-project-name",
  "private": true
}
You can add more information, such as version or description and custom commands (see below), but that's all optional for most projects, especially small/personal projects.
(Alternatively, instead of creating the file yourself, you can run the
npm initcommand, which will ask you some questions about your project and generate the file for you.)
Done! Now you can now start installing packages.
Custom Commands
In the package.json you can define custom commands to "replace" other commands. The command for custom commands is always npm run <command name>.
For example:
"scripts": {
    "build": "npx @11ty/eleventy"
}
will run the command npx @11ty/eleventy when you execute npm run build.
You can even run two commands with one (seperated by a &), for example:
"scripts": {
    "build": "npx @11ty/eleventy & webpack"
}
will run the commands npx @11ty/eleventy and webpack when you execute npm run build.
More info on custom commands here.
GitIgnore
If your project is a git repository you should add node_modules to your gitignore file, because the folder should not be added to your repository (because it is quite large and generated automatically).
If you don't have a gitignore file yet, create it like this: In the root folder of your project, create a file with the name .gitignore (don't forget the period at the start). In it, type node_modules. This will make git ignore the node_modules folder, as if it wasn't there.
Don't know what Git is? Check out my git tutorial.
Installing Packages
You can install packages using this command: npm install <package>, e.g. npm install webpack.
Note: Packages are either installed as dependencies or development dependencies (devDependencies). The distinction is probably not important to you as a beginner: either is fine. To install a package as a devDependency use this command:
npm install <package> --save-dev
Here's what happens when you install a package: npm checks if that package exists, looks for the most recent version of it, and tries to download and install the package. If successful, these things happen:
- The package name and version will be added to the list of dependencies in your
package.jsonfile. - A
package-lock.jsonwill be created, which contains information about all installed packages. (You won't need to look at this file, but don't delete it.) - A
node_modulesfolder will be created in your project which contains the necessary files for this package.
You should never manually edit anything in the node_modules folder or the package-lock.json file. (And you won't have to, anyway.) Since these files are generated automatically any changes you make in them would be soon overwritten.
If, instead of these things happening, you get an error read the 'troubleshooting' section below.
You can uninstall packages by running npm uninstall <package>.
Understanding Dependencies in package.json
Once you have some packages installed they will be listed in your package.json file, e.g.:
"devDependencies": {
    "@11ty/eleventy": "^2.0.1",
    "css-loader": "^7.1.2",
    "sass": "^1.77.8",
    "sass-loader": "^16.0.1",
    "style-loader": "^4.0.0",
    "tippy.js": "^6.3.7",
    "webpack": "^5.94.x",
    "webpack-cli": "^5.1.4"
  },
The first value is the name of the package, the second is the version rule. The version rules can look like this:
1.2.3: only version 1.2.3, nothing else^1.2.3: version 1.2.3 or higher, but below 2.0~1.2.3: version 1.2.3 or higher, but below 1.31.x.x: version 1.0.0 or higher, but below 2.01.2.x: version 1.2.0 or higher, but below 1.3*: any version
and so on.
You can edit these manually and install them by running npm install (more info on that later). However, it's also possible to install/update/deinstall packages with command line commands alone, without editing this file manually.
These version rules are based on semantic versioning. Essentially, this just means that the first number is a major release (which breaks backward comaptibility), the second number is a minor release (which adds new features), and the third number is a patch release (which fixes bugs). Sometimes, the second and/or third number is left out, which implies ".0" (e.g. 1.3 = 1.3.0)
npm install and npm update
One more thing you need to know:
The command npm install (without specifying a package) 'reads' the dependency list in your package.json file and makes sure all packages are installed in the right version. If, for some reason, you delete your node_modules folder or package-lock.json, you can get them back with npm install.
There is also the command npm update, which (confusingly) does the same thing as npm install but also checks for newer versions of packages. You probably won't need this unless you're planning on updating to newer version of a package.
Troubleshooting
Clean Slate: If you feel like you messed up everything, just delete the entire node_modules folder and the package-lock.json file, make sure your dependency list is correct, and execute npm install again for a "fresh" install.
Cache Problem: If you get an error along the lines of Failed to remove some directories. EPERM: operation not permitted on Windows, execute npm cache clean --force and try whatever you did again.
Dependency Conflicts: Packages that you install need to fit together. For example, if you install package-a and it required version 1.2-1.5 of package-b, and you then try to install version 3.6 of package-b it obviously won't work! Problems like these are called conflicts, and how to resolve them depends on what you're trying to do. In the example I just gave, one solution would be to check for a newer version of package-a that requires a more up-to-date version of package-b. Alternatively, you could also install an older version of package-b so that the requirement of package-a is fulfilled. For a more detailed explanation, read 'How to Resolve Conflicts' below.
How to Resolve Conflicts
Read
Imagine our package.json contains these two dependencies for package-a and package-b:
"devDependencies": {
    "package-a": "^5.74.0",
    "package-b": "^3.3.11"
},
Let's say we try to run npm install and get this error, which shows a conflict between the packages package-a and package-b:
While resolving: my-project@undefined
Found: package-a@5.94.0
dev package-a@"^5.74.0" from the root project

Could not resolve dependency:
peer package-a@"4.x.x" from package-b@3.3.12
node_modules/package-b
dev package-b@"^3.3.11" from the root project
I know it looks confusing, but let's go through it line-by-line.
While resolving: my-project@undefinedtells us that in our project (with the name my-project) there was an error found. Alright, we already knew this.Found: package-a@5.94.0tells us that npm found the version 5.94.0 of package-a and is trying to install it.dev package-a@"^5.74.0" from the root projecttells us that in our package.json file we have defined that we want to have package-a version 5.74 or higher, but under 6.0. That's why package-a is trying to install 5.94.0: It's the most up-to-date version of package-a that fulfills the rule we have defined.Could not resolve dependency:is a clear hint that this is a version conflict. Let's continue reading to understand what the problem is.peer package-a@"4.x.x" from package-b@3.3.12tells us two things:- npm found version 3.3.12 of package-b and wants to install it, because it's the most up-to-date version of package-b which fulfills the rule we have defined.
- Version 3.3.12 of package-b, however, requires package-a version 4.x.x (so any version above 4.0 and below 5.0). This is a problem, because npm wants to install package-a 5.94.0, which is too high!
node_modules/package-b- this line isn't important, it just tells us where our package-b package is located.dev package-b@"^3.3.11" from the root projectreminds us of the fact that, in our package.json, we define the rule that we want version 3.3.11 or higher (but below 4.0) of the pacakage package-b.
So, the problem is that, according to the rules we defined in our package.json, we want package-a@"^5.74.0" (= 5.74 or higher but below 6.0) and package-b@"^3.3.11" (= 3.3.11 or higher but below 4.0), but package-b at that version needs package-a@"4.x.x" (= 4.0.0 or higher but below 5.0).
Solution: Update package-b so it requires the version of package-a we're using. OR: Downgrade package-a so it fits what package-b wants.
You can update/downgrade a package by deinstalling it and installing it at a different version, or by manually editing the rule in the package.json file and running npm install (in the hopes that the dependencies now fit together so that there won't be a conflict anymore).
Additional Commands
- Show all installed packages:
npm list -g --depth=0 - Show all outdated packages:
npmoutdated - Show the newest available version of a package:
npm view <package> version,
e.g.npm view webpack version
I spend hours of my free time writing these tutorials that I publish for free. If you'd like to say thanks, please share this tutorial with others and/or buy me a coffee!


Comments
Leave your questions, problems, suggestions, requests and thanks here!
To share very long code or error messages with me, please upload it to pastebin (or a similar site) and include the link. This is to make sure you don't hit the max character limit on comments.