Git & GitHub Tutorial
When I tried to learn git I had a lot of trouble, because even though they are 'beginner tutorials' out there, all of them were either too complicated to too minimalistic. So, here's my attempt to teach you exactly the steps you need to use git as a beginner.
Why to use Git:
- You will be able to see the change history of your files. If you break something, you can easily restore old versions of files.
- You will have an online version of your project, which you can share with others. (It's also a neat backup so your project can't be lost!)
- You will be able to work with other people on your project.
- If you connect your repository to the host of your website (e.g. Neocities), all changes will automatically be uploaded there as well. (See step 5 for details.)
If you want to look at an example GitHub repository, check out the one for this very website!
This tutorial was written using git version 2.41.0. If you use a much older or newer version some of the information here might be outdated! You can check your version by running: git -vIf you have questions or feedback regarding the tutorial, please use the comment section at the end of the page! Don't be shy; I know it's frustrating when you're stuck, and I'd love to help.
Understanding Git
Git vs GitHub
First, let's look at SimpleWikipedia's definition of git and GitHub:
Git is a distributed revision control system. It is a computer program that helps people create other computer programs together. GitHub is an online software development assistance and version control service. This platform uses Git.
We will be working with both Git and GitHub. To clarify, this is the difference:
- Git is the core technology, with which you can create git repositories.
- GitHub.com is a web interface for git repositories. There are other ones too, but GitHub is by far the most popular.
You can think of a repository as a project. For example, I have a repository for a game I'm making and another repository for my website (go ahead and check it out to get a sense of what it looks like!)
What we'll do
We will be connecting our local files (aka the project on your PC) with your GitHub repository (aka the files uploaded to GitHub). Then, with just one command/click, you will be able to upload your local changes to the online repository. Other people can look at and download your repository (if you have set it to public). You will also be able to view the change history of every file.
Also, other people can work on your repository (though all changes need to be approved by you, obviously). That's like, one of the main reasons to use git (besides version control). However, I will not go into this in detail. It's important to understand the basics first. And for your beginner project/website it's probably just you anyway.
The process
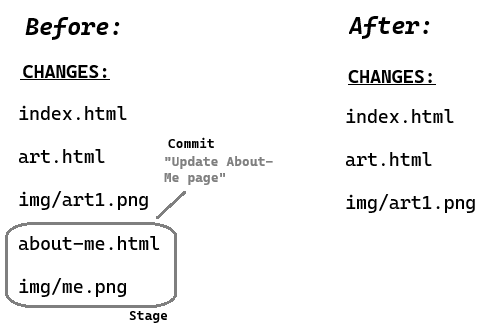
You will make changes in your project as usual. Once you've made a few changes you will choose ("stage") the changed files that belong together (for example a new feature, an edited page, etc.) We will then commit these chosen ("staged") files and give all of the changes a name, e.g. "Update About-Me Page".
I've tried to visualize it here: (Behold my magnum opus)

Requirements
Install Git
You need to have git installed on your device.
Go here to download Git. If you're using Windows you can also download it here.
GitHub Account
Create an account on Github.com, if you don't already have one.
If you're using VSCode I highly recommend logging in with your GitHub account in VSCode. Go here for more information.
How to use commands
You need to be able to use command line comments.
If you're using VSCode, simply right-click the file tree on the left side of the program and choose "Open in Integrated Terminal". This will open the terminal on the bottom of the program:


Other IDEs (= programs you code in) might also have integrated terminals. If you use Notepad++ or other simple editors to work on your code you can open a Windows terminal by right-clicking in your folder in the Windows explorer and choosing "Open in Terminal" (I'm using Windows 11 so it might be labelled differently for you). The Windows Powershell will open.
Some very basic commands you should know: (cd stands for 'change directory')
cd ..to move to the next folder upcd <folder>to move into the folder, e.g.cd images/gifs
To stop/cancel a running command you can use Ctrl+C.
If it's a git command, such as git log, you can end it by pressing q (short for 'quit').
1. Creating a new project
Go to GitHub and create an empty repository. You could call it my-website or example.neocities.org or something like that. Do not include a .README file.

On the repostiory page, copy the HTTPS (not SSH!) link. We will need this in a second.

(If you want to find this link later, it will be in the "Code" menu:)

Open a terminal in your project folder. (If you don't have a project folder yet create it now and add at least one file.)
Then execute the following commands one by one: (In the second one, replace <https link> with the link you just copied!)
git init
git remote add origin <https link>
git add .
git commit -m "First Commit"
git branch -M main
git push --set-upstream origin main
git pull --set-upstream origin main
Explanation:
git initinitalizes your current folder as a git repositorygit remote add origin ...connects your local folder with the GitHub repository you have created on github.comgit add .stages all your files. (you will learn what this means in a second)git commit -m "First Commit"commits the staged files. (you will learn what this means in a second)git branch -M mainrenames the branch to 'main'. This is sometimes necessary because sometimes the branch is called 'master' by default, which is wrong for our example.git push --set-upstream origin mainpushes (= uploads) your local files to your GitHub repository. This is also where we define the main branch as the default target for this command, which we will only have to do this one time.git pull --set-upstream origin mainpulls (= downloads) the files in your GitHub repository into your local folder. (Right now this won't do anything because the files in your GitHub repostiory and your PC are the same.) This is also where we define the main branch as the default target for this command, which we will only have to do this one time.
Troubleshooting
If you get the error "error: remote origin already exists." execute git remote rm origin and try again.
If you initalized the GitHub repository with a .README file, you might have to execute these commands instead:
git init
git remote add origin <https link>
git switch -c main
git add .
git commit -m "First Commit"
git pull --set-upstream origin main --allow-unrelated-histories
git push --set-upstream origin mainIf you want your project folder not to be a git repository anymore, you have to delete the (hidden) .git folder in the project: Open your project in the Windows Explorer, make visible files and folders visible in the settings of the Windows Explorer, and delete the .git folder. You can now start from the beginning (git init and so on).
You should now see your project files in your repository on GitHub.com!
The set-up for this project is now done. What you will learn next is what you will do whenever you work on your project!
2. Staging changes
Edit your code as you usually would. Once you want to "save" your changes it's time to add all changed files that you want to "save" to the so-called staging area by staging them. You can think of this step as choosing which files to save together as a feature.
When using commands, execute this for every file:
git add <file>...for example: git add index.html
If you want to stage multiple files at once you can do something like this: (this would stage every changed file in the 'blog' folder) git add blog/.
To stage every changed file, you can simply do: git add .
Or: When using the VSCode UI simply press the small "+" next any changed file to stage it:

Show me how to un-stage files
Unstaging Files
When unstaging files your changes will not be undone. The only thing that changes is the status of the file: It will change from staged to unstaged.
To un-stage files/folders, execute git restore --staged <file> or git reset HEAD -- <file> (They do the same thing.)
Or: When using the VSCode UI simply press the small "-" next to any staged file to unstage it:

Important tip: To show the status of all files, use
git status.
This will show you which files have been changed, and whether these changes are already staged or not. Keep in mind that one file can be both staged and unstaged if you made changes in it after staging other changes.
3. Committing changes
Every staged file can then be 'commited'. You can think of this as "saving" all the changes that belong together (e.g. a feature, new page, bugfix).
When using commands, execute this once: (-m stands for message, which is the title you give your commit)
git commit -m "Example message"Or: When using the VSCode UI simply type your message into the input box at the top and click 'Commit':

Some good examples for commit messages:
- "BUGFIX: Fix order of gallery items"
- "Create gallery element"
Some bad examples for commit messages:
- "i changed the color of the title" (too narrative)
- "update" (too indescriptive)
Amending changes
If you want to add more changes to your most recent commit instead of creating yet another commit, you can amend your changes.
Show me how to amend changes
Only do this if you haven't pushed your most recent commit yet!
Stage your files as you usually would. Then, instead of using git commit, do:
git commit --amend -m "an updated commit message"or, if you don't want to change your previous commit message, you can do:
git commit --amend --no-editThis will add your changes to your most recent commit. The commit message will stay unchanged.
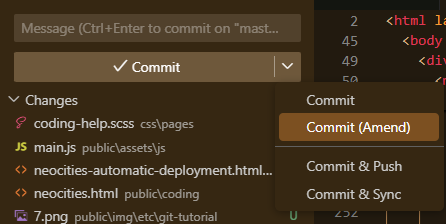
Or: If you're using VSCode you can open the submenu of the "Commit" button and click "Commit (Amend)":

Undoing commits
If you commited something that you didn't mean to, you can undo it.
Show me how to undo commits
There are two ways to "undo" a commit.
- Revert = It's as if someone had gone it and changed everything back; the changes stay visible in the edit history of the file.
- Reset = It's as if the commit had never happened. (Not recommended.)
How to Revert
To revert a commit you can execute:
git revert --no-edit <commit_hash>That will create a new commit that undoes the changes in your previous commit.
You can find the commit hash of your previous commit by showing a list of the previous commits with git log --oneline. The hash could look like this: fcd745f or this: fcd745f74822c61cf30442407165c1b86fe5ccf5 . (How to copy the ID depends on which terminal you're using. Perhaps Ctrl+C as usual, perhaps selecting the ID and right-clicking to paste it into the current command, perhaps in a completely different way.)
How to Reset
To reset a commit that has not been pushed yet you can execute:
git reset <previous_commit_hash>You need to use the commit hash of the commit you want to reset to, not of the commit you are resetting. This means you have to use the commit hash of your second-to-last commit.
After executing this command the commit will be undone, but the edits you want gone are still there as unstaged changes. You can undo them manually or use git restore .
4. Pushing changes
Now that you have created your commit(s), we can push (= upload) them into the repostiory.
Simply execute:
git pushOr: When using the VSCode UI simply press "Sync Changes":

Now, if you refresh your GitHub page, you should see the changes.
If you click on the "Commits" button you can see a list of all your previous commits/changes.

Connecting to Neocities (Optional)
With the help of a GitHub Action you can connect your repository to your Neocities website. This way, all changes to your GitHub repository will be automatically uploaded to Neocities the moment you push them. (It only updates the files that were actually changed, don't worry about your Neocities feed.)
How to set it up:
- Make sure all the files in your project that should be uploaded to Neocities are in a folder called public.
- Create the following file in the root of your project (NOT in the public folder):
.github/workflows/neocities.yml
Make sure you spell it correctly! Don't forget the "." at the start of the first folder name. - Insert the code shown here into your file.
- If your branch is called 'main' instead of 'master' make sure to change that on line 7.
- Comment out (= add a # at the start of the lines) or delete lines 21 to 28. You don't need them.
- If you want to you can set cleanup to true. This means that files that are still in your Neocities but not in your project anymore are deleted from Neocities. (I recommend this, otherwise you will eventually run out of space in your Neocities account.)
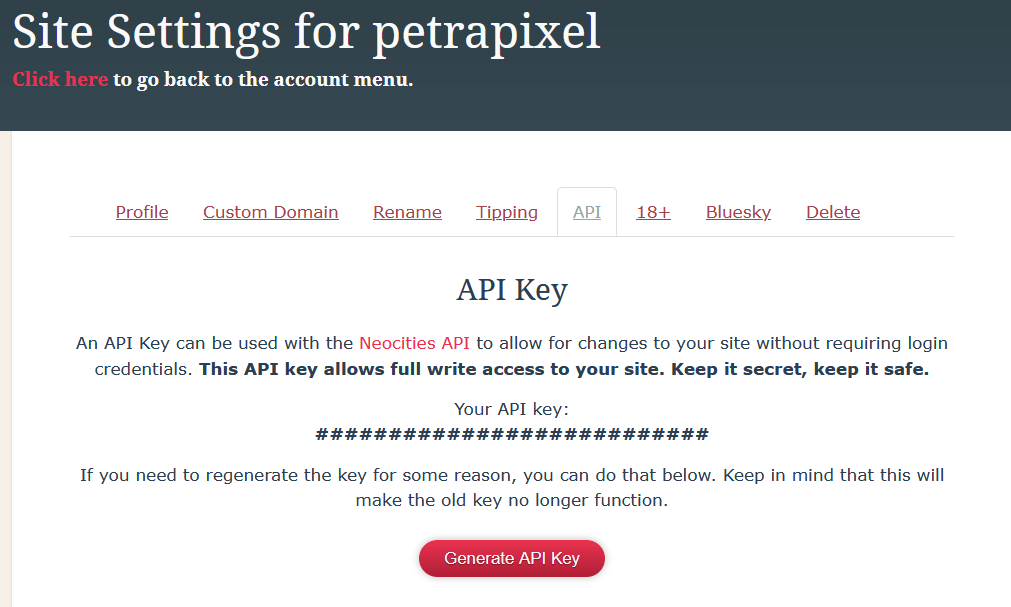
- Get your API Key for your Neocities account. (It can be found in your Site Settings on Neocities under "API").

- Open your repository on GitHub, go to its "Settings", then "Secrets and Variables" -> "Actions". Add a secret with the name NEOCITIES_API_TOKEN and set your Neocities API Key as the value.

Done! Now whenever you push to your master/main branch, the changed/added files will automatically be uploaded to your Neocities site.
Additional Commands
Here are some additional commands I will offer you without much context. Google them if you want to know more.
- To show all files and their current state (e.g. not staged, staged):
git status - To show a log of all commits:
git log --onelineorgit log - To show all changes:
git diff, or just a specific file/folder:git diff <path> - To discard the changes in a (not-yet-staged) file:
git restore <file>or all:git restore . - To show the git version you're using:
git -v
Remotes:
- Show all remotes:
git remote -v - Delete a remote
git remote remove <name>
Branches:
- Show branches:
git branch - Make new branch and check it out:
git switch -c <new-branch>
(used to begit checkout -b <new-branch>. more info here.) - Add current changes to new branch: Do the above, your changes will be kept
I spend hours of my free time writing these tutorials that I publish for free. If you'd like to say thanks, please share this tutorial with others and/or buy me a coffee!

Comments
Leave your questions, problems, suggestions, requests and thanks here!
To share very long code or error messages with me, please upload it to pastebin (or a similar site) and include the link. This is to make sure you don't hit the max character limit on comments.
